Stable Diffusion 모델은 텍스트를 이미지로 변환하는 강력한 도구입니다. 그러나 모델의 성능을 극대화하기 위해서는 추가적인 이미지 프롬프트와 같은 방법들이 필요할 수 있습니다. 이때 IP-Adapter를 활용하면 이미지 프롬프트를 통해 모델의 정확성을 크게 향상시킬 수 있습니다. 이 글에서는 IP-Adapter를 활용한 Stable Diffusion 파인튜닝 방법을 소개하고, 이를 통해 보다 나은 결과를 얻는 방법을 설명하겠습니다.
Hugging Face의 공식 문서를 참고해 작성한 포스팅입니다.
파인튜닝 방법이 궁금하시면 아래 글을 참고해주세요.
Stable Diffusion과 파인 튜닝 방법: 완벽 가이드
인공지능(AI)과 딥러닝은 현대 기술의 중심에 있으며, 이미지 생성 모델은 그 중에서도 많은 주목을 받고 있습니다. Stable Diffusion은 최근 많은 관심을 받고 있는 이미지 생성 모델 중 하나로, 텍스
contentstailor.com
IP-Adapter란 무엇인가?
IP-Adapter는 이미지 프롬프트 어댑터로, 기존 모델을 수정하지 않고도 이미지 프롬프트를 사용할 수 있게 해줍니다. 이는 텍스트와 이미지 특징을 구분하여 별도의 크로스-어텐션 레이어를 추가하는 메커니즘을 통해 이루어집니다. 이러한 구조는 모델이 보다 이미지 특화된 특징을 학습할 수 있도록 도와줍니다.
또다른 파인튜닝 방법인 Dreambooth를 이용한 파인튜닝을 알고 싶으시면 아래 글을 참고해주세요.
DreamBooth를 활용한 이미지 파인튜닝: 코드와 구현 방법
최근 몇 년 동안 딥러닝 기술의 발전은 이미지 생성 및 변형 작업을 한층 더 혁신적으로 만들었습니다. 특히, DreamBooth와 같은 기술을 활용하면 특정한 이미지 스타일이나 특성을 학습하여 새로
contentstailor.com
IP-Adapter 사용 방법
준비 사항
먼저 필요한 라이브러리를 설치하고 환경을 구성합니다.
from diffusers import AutoPipelineForText2Image
from diffusers.utils import load_image
import torch
모델 로드 및 IP-Adapter 추가
Stable Diffusion XL 모델을 로드하고 IP-Adapter를 추가합니다.
pipeline = AutoPipelineForText2Image.from_pretrained("stabilityai/stable-diffusion-xl-base-1.0", torch_dtype=torch.float16).to("cuda")
pipeline.load_ip_adapter("h94/IP-Adapter", subfolder="sdxl_models", weight_name="ip-adapter_sdxl.bin")
pipeline.set_ip_adapter_scale(0.6)
텍스트 및 이미지 프롬프트 사용
텍스트 프롬프트와 이미지 프롬프트를 생성하고 이를 파이프라인에 전달하여 이미지를 생성합니다.
image = load_image("https://huggingface.co/datasets/huggingface/documentation-images/resolve/main/diffusers/ip_adapter_diner.png")
generator = torch.Generator(device="cpu").manual_seed(0)
images = pipeline(
    prompt="a polar bear sitting in a chair drinking a milkshake",
    ip_adapter_image=image,
    negative_prompt="deformed, ugly, wrong proportion, low res, bad anatomy, worst quality, low quality",
    num_inference_steps=100,
    generator=generator,
).images
images[0]
이미지 임베딩
IP-Adapter 파이프라인은 미리 계산된 이미지 임베딩을 받아들일 수 있습니다. 이는 여러 이미지를 사용할 때 매우 유용합니다.
image_embeds = pipeline.prepare_ip_adapter_image_embeds(
    ip_adapter_image=image,
    ip_adapter_image_embeds=None,
    device="cuda",
    num_images_per_prompt=1,
    do_classifier_free_guidance=True,
)

torch.save(image_embeds, "image_embeds.ipadpt")

image_embeds = torch.load("image_embeds.ipadpt")
images = pipeline(
    prompt="a polar bear sitting in a chair drinking a milkshake",
    ip_adapter_image_embeds=image_embeds,
    negative_prompt="deformed, ugly, wrong proportion, low res, bad anatomy, worst quality, low quality",
    num_inference_steps=100,
    generator=generator,
).images
IP-Adapter 마스킹
마스킹을 통해 출력 이미지의 특정 부분을 IP-Adapter에 할당할 수 있습니다.
from diffusers.image_processor import IPAdapterMaskProcessor

mask1 = load_image("https://huggingface.co/datasets/huggingface/documentation-images/resolve/main/diffusers/ip_mask_mask1.png")
mask2 = load_image("https://huggingface.co/datasets/huggingface/documentation-images/resolve/main/diffusers/ip_mask_mask2.png")

output_height = 1024
output_width = 1024

processor = IPAdapterMaskProcessor()
masks = processor.preprocess([mask1, mask2], height=output_height, width=output_width)

pipeline.load_ip_adapter("h94/IP-Adapter", subfolder="sdxl_models", weight_name=["ip-adapter-plus-face_sdxl_vit-h.safetensors"])
pipeline.set_ip_adapter_scale([[0.7, 0.7]])

face_image1 = load_image("https://huggingface.co/datasets/huggingface/documentation-images/resolve/main/diffusers/ip_mask_girl1.png")
face_image2 = load_image("https://huggingface.co/datasets/huggingface/documentation-images/resolve/main/diffusers/ip_mask_girl2.png")

ip_images = [[face_image1, face_image2]]
masks = [masks.reshape(1, masks.shape[0], masks.shape[2], masks.shape[3])]

generator = torch.Generator(device="cpu").manual_seed(0)
num_images = 1

image = pipeline(
    prompt="2 girls",
    ip_adapter_image=ip_images,
    negative_prompt="monochrome, lowres, bad anatomy, worst quality, low quality",
    num_inference_steps=20,
    num_images_per_prompt=num_images,
    generator=generator,
    cross_attention_kwargs={"ip_adapter_masks": masks}
).images[0]
image
특정 사용 사례
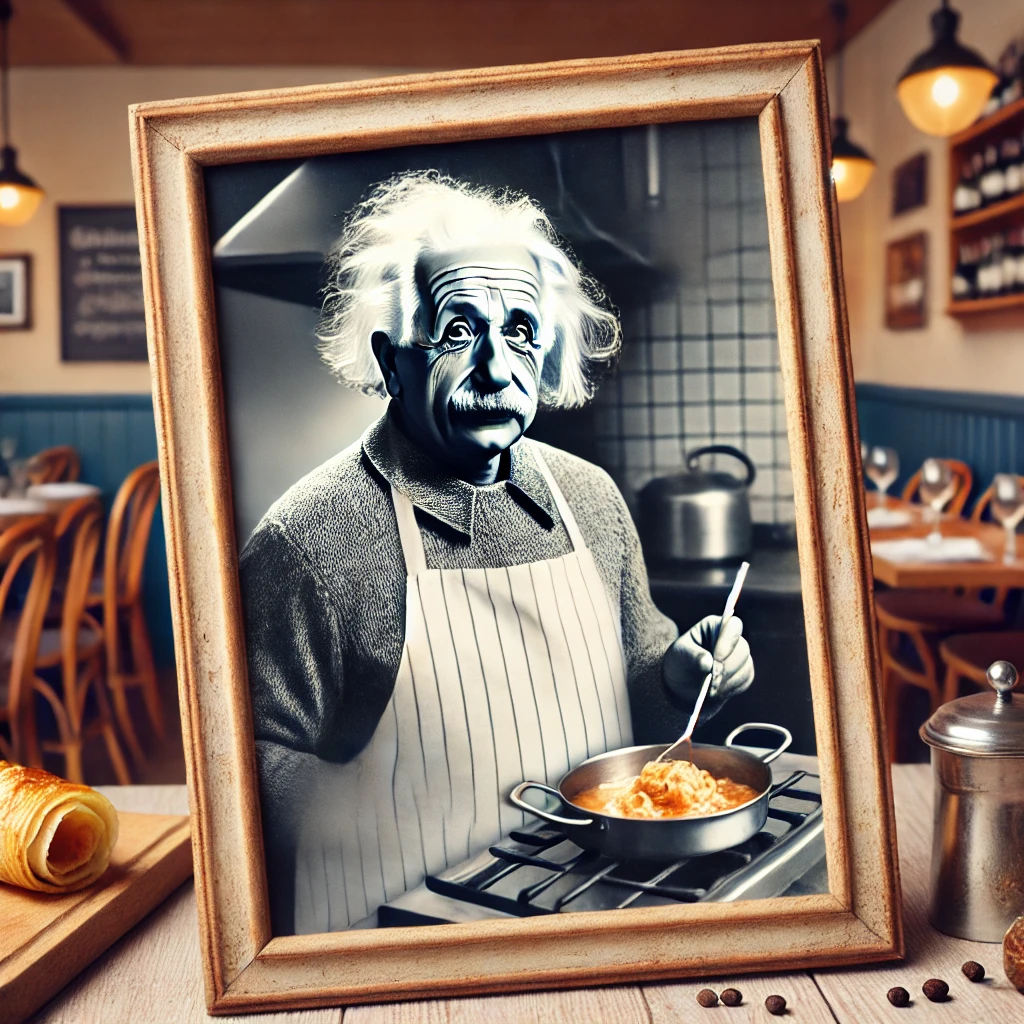
얼굴 모델 생성
얼굴 이미지를 생성하는 것은 매우 어려운 작업입니다. 이를 위해 특화된 IP-Adapter 체크포인트를 사용할 수 있습니다.
pipeline.load_ip_adapter("h94/IP-Adapter", subfolder="models", weight_name="ip-adapter-full-face_sd15.bin")
pipeline.set_ip_adapter_scale(0.5)

image = load_image("https://huggingface.co/datasets/huggingface/documentation-images/resolve/main/diffusers/ip_adapter_einstein_base.png")
generator = torch.Generator(device="cpu").manual_seed(26)

image = pipeline(
    prompt="A photo of Einstein as a chef, wearing an apron, cooking in a French restaurant",
    ip_adapter_image=image,
    negative_prompt="lowres, bad anatomy, worst quality, low quality",
    num_inference_steps=100,
    generator=generator,
).images[0]
image
멀티 IP-Adapter
여러 IP-Adapter를 동시에 사용하여 특정 스타일의 이미지를 생성할 수 있습니다.
pipeline.load_ip_adapter(
  "h94/IP-Adapter",
  subfolder="sdxl_models",
  weight_name=["ip-adapter-plus_sdxl_vit-h.safetensors", "ip-adapter-plus-face_sdxl_vit-h.safetensors"]
)
pipeline.set_ip_adapter_scale([0.7, 0.3])
pipeline.enable_model_cpu_offload()

face_image = load_image("https://huggingface.co/datasets/YiYiXu/testing-images/resolve/main/women_input.png")
style_folder = "https://huggingface.co/datasets/YiYiXu/testing-images/resolve/main/style_ziggy"
style_images = [load_image(f"{style_folder}/img{i}.png") for i in range(10)]

generator = torch.Generator(device="cpu").manual_seed(0)

image = pipeline(
    prompt="wonderwoman",
    ip_adapter_image=[style_images, face_image],
    negative_prompt="monochrome, lowres, bad anatomy, worst quality, low quality",
    num_inference_steps=50, num_images_per_prompt=1,
    generator=generator,
).images[0]
image
결론
IP-Adapter는 Stable Diffusion 모델의 성능을 극대화할 수 있는 강력한 도구입니다. 이를 통해 모델의 이미지 생성 능력을 향상시키고, 보다 정확하고 다양한 이미지를 생성할 수 있습니다. 이 글에서 소개한 방법들을 활용하여 여러분의 프로젝트에 IP-Adapter를 적용해 보세요.
추가 정보는 Hugging Face의 공식 문서에서 확인할 수 있습니다.
'AI 기술' 카테고리의 다른 글
| GCP를 활용한 데이터 파이프라인 구축 및 배포: BigQuery에서 머신러닝 모델 배포까지 (0) | 2024.07.25 |
|---|---|
| LangChain: 혁신적인 언어 모델 프레임워크 (0) | 2024.07.19 |
| Stable Diffusion XL 활용해서 고품질 이미지 제작하기 (0) | 2024.07.13 |
| 텍스트-투-이미지 변환: Hugging Face Diffusers 라이브러리를 사용한 실습 (0) | 2024.07.03 |
| BEiT: 이미지 변환기를 위한 BERT 사전 학습 (0) | 2024.07.02 |


